Archive | Cookbooks RSS feed for this section

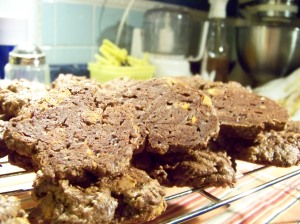
Triple Chocolate Cookies

10 Feb

Triple Chocolate Cookies with Oats
Qty. approx 48

Notes:

You can substitute the cocoa and chocolate more to your tastes, and use candy bars if necessary: Natural for the Dutch-processed cocoa; milk chocolate for the unsweetened, etc.

You can use any kind of chips you like.  These cookies are a good way to empty any open bags of chips laying around.  You can also experiment with the amount of chips you use.

If you’re called away, keep the dough cool (but not frozen) until you can finish the batch.

Dry Ingredients
1¾ c. bread flour
¼ c. AP flour
¼ c. Dutch-processed cocoa
1¾ c. oats
1 c. brown sugar
¼ c. white sugar
1 TBL instant espresso
½ tsp baking powder
2 tsp salt
8 oz. white chocolate chips
8 oz. semisweet chips
4 oz. milk chocolate chips

Wet Ingredients and Fats

2 TBL unsalted butter, melted
6 TBL unsalted butter, softened
2 TBL lard or shortening (lard preferred)
3 eggs
1 egg yolk
2 TBL dark corn syrup
2 TBL vanilla (or to taste)
10 oz. bittersweet chocolate, melted
2 oz. unsweetened chocolate, melted
2 TBL vegetable oil

Preheat oven to 350 F. Place rack in the middle; line room temp baking sheets with parchment.

Begin melting chocolate with 1 TBL of the vegetable oil. This can be done in the microwave, or over direct, very low heat.  Once melted, mix in cocoa and allow to cool.

While you’re at the stove or microwave, heat up a very small amount of water to add to the instant espresso, then set aside.  Then, melt the 2 TBL of butter and set aside to cool. (That’s important!)

While the chocolate is melting, begin assembling the rest of the cookies:

Cream the butter, lard, 1 tsp of the salt and brown sugar in a mixer set to medium.  (Use beater attachments.) This will take about four minutes to fluff up and lighten in color a bit.  If you need to use a hand mixer for this, that’s fine; no need to worry about timing. Everything can sit for a few extra minutes if necessary.

In a separate mixing bowl, mix your room temp eggs, single yolk, white sugar, corn syrup, vanilla, cooled espresso paste, cooled melted butter and last TBL of salt.  (If the butter’s too warm, it’ll cook the eggs.  No joke.)  Use a whisk to incorporate the ingredients, but gently: Do not incorporate air.  If you incorporate too much air, combined with the baking powder your cookies may rise too quickly, the droop and spread.

Allow this mixture to sit for a couple minutes, mix, then repeat once more in another couple minutes.

While the egg mixture sets and activates, assemble the dry ingredients in another bowl: Whisk together flours, oats, baking powder and chips until slightly aerated and well-mixed.  This takes less manpower than you think, so be careful not to overmix.

At this point, you can turn around and mix the egg mixture.  (You’ll notice that the salt has activated the flavors, sugars, and eggs. Another stir helps this along.)  Now, you can incorporate the chocolate into the egg mixture with the same whisk.

Pour the egg/chocolate mixture into the bowl containing the creamed butter and sugar.  Mix this on low until incorporated; about 30 seconds or so.  This will not be a smooth mixture, so again, don’t overmix.

Finally, add the flour/chip mixture.  Use the lowest setting, or mix by hand.  A good rule of thumb?  Your batters and doughs are usually mixed properly well before you think they are.  Overmixing will flatten bakery, making it tough and dense.

Set the dough aside in a cold space to set the dough: About 30 minutes in a freezer, or 1 hour in a fridge or cold mudroom.  AC vents are useful for this in warmer climates, too, but if necessary, you can let the dough set on its own at room temperature for a few hours.  The melted chocolate will take care of this eventually.

Once set, use a 1½ TBL scoop to place 9 to 12 cookies on the pan.  (I always start low in case I’ve done something wrong.)  You’ll want to shape these cookies using either your index and middle fingers, or the bottom of your scoop.

Rotating, parchment and room temp cookie sheets will help ensure that your cookies do not burn.

Bake for 12 minutes, rotating at the 6-minute mark.  You can do these two cookie sheets at a time, too, by using a rack just beneath the middle one.  However, this makes rotating the cookies—turning them around and switching racks—very important.

Repeat until finished, using room temp cookie sheets each time.  You can re-use the parchment each time so you don’t have to wash them.  In fact, I can’t remember the last time I washed my cookie sheets.  But you know what?  What burns never return, my friends.

Please let me know if you have questions, suggestions, or anything else.  Your feedback is important to me!
Chai Cookies, Step Two

30 Jan

For step one, please click here.  For the sugar cookie base, please click here.

It’s good to note before you get started here that you’ll want the best available spices for this.  Now, if you can’t afford to spend a lot, that’s no problem; I think a strong, authentic chai could still be approximated using standard grocery store spices.  In this case, you’ll want to compensate with higher quantities of flavors that remain strong and sharp even in their cheapest state.  (Ginger and black pepper come to mind.)

What will work best, on the other hand, are bulk spices that you grind and pulverize yourself in a mortar and pestle.  Many grocery stores now carry truly inexpensive bags of bulk spices in their produce departments: Whole nutmeg, cloves, and cinnamon sticks, for example.  These are also often available at ethnic grocery stores and of course, through my favorite spice house, Penzeys.

Things get a little trickier from here.  As noted earlier, an authentic proportion of spices is difficult to find in a cookie recipe.  This is where you come in.

Step Two: Chai Flavor

Consider this a great challenge as a developer, the experience of which you’ll relish even as you contemplate bashing your head in with the mortar and pestle you’ve been using for several strained hours under bright kitchen lights.  You’ll learn a lot doing this but know that you won’t have the proper mix together until your heart breaks along with your back.  Pre-mixed “chai” spices just won’t do this for you.

I can give you general guidelines, but what you’ll want to do is find a cup of your favorite chai and taste it several times with cream, and then without.  But more importantly, grab the list of ingredients, and with this you can collect the spices you’ll need.  Generally, you’ll want large quantities of:

  • Black pepper
  • Cardamom, green and black
  • Ginger
  • Star Anise
  • Cloves

Plus, you’ll need smaller quantities of standard baking spices for a well-rounded flavor:

  • Nutmeg
  • Allspice
  • Cinnamon
  • Mace
  • Orange/Lemon Peel
  • Baking spice mixes

You’ll develop your mix using the egg mixture created in step four of my standard sugar cookie recipe.  Start with a ¼ tsp of each spice, add a pinch of salt, mix and taste.  At this point it’ll probably taste like coffeecake, so start adding each of those top five spices about 1/8 tsp at a time.  (Include a dash of salt with each iteration.)

You’ll want this to be quite strong, and don’t be surprised if you’ve added more pepper than anything else; the trick is to keep going until you think it’s just about too much. Once you think you might’ve crossed the line, begin adding salt, about a dash at a time, until the flavor is full-bodied—until it seems as though it’s bloomed.  You’ll proceed with the process as usual after this.

What really brings it home, however, is adding your spice mix into your rolling sugar.  This does not need to be exactly the same as what you added to the egg mixture; it really only needs to be sharp and spicy so you’ll again want to use a good amount of black pepper, cardamom, ginger and star anise in the mix, plus wee amounts of baking spices.  Roll your cookies in this mixture generously, then bake.

Now, if in the end you find the flavor too sharp, too peppery, or too whatever, you can save these by dusting the cookies with powdered sugar; adding vanilla frosting; dipping in white or dark chocolate; or crumbling them into ice cream.  Failing that, set them out to dry for a week or so, then use them for a cookie crust topped with a soft meringue.  It’s your choice.  Either way, you will have done something special by putting the real chai experience in a mere cookie, all while honing your taste and observation skills .

Happy pulverizing!

Baking Plans in a Bitter Moment

23 Sep

Guys, I am a complete loss of what to make.  Honestly, work’s such a grind, just a f*&*!ng grind, and I can’t think of anything except how ridiculous it is that Target’s using “For Those About To Rock… We Salute You” in a spot advertising a griddle.  If I listen to AC/DC, will I be inspired?  Or will I just move into the all-white neighborhood down the road from the Target and just give up, like the lady in the ad?  Organic blueberry pancakes and five-dollar butter, comin’ right up.

Well, no.  I will come up with something.  I prefer the Bon Scott version of AC/DC anyway.

Gluten-Free Baking

22 Sep

I know next to nothing about gluten-free baking, except that it’s pretty easy to turn gluten-free baked goods into bricks.  But it’s a challenge, isn’t it, to get this right just for the sake of it: I have no allergies to gluten or anything else, and neither does anyone I know.  I want to be good at it anyway.

Among the myriad issues surrounding gluten-free baking, there’s another significant hurdle to getting it right, and that’s the expense.  Gluten-free ingredients are far from cheap and it’s an enterprise that will require more tests than I can count.  Plus, I have to replace the shocks in my Saturn.  All this together means that I will be using this weekend for research.

Which leaves me with the question:  What should I bake this weekend instead?  I promised a new project, and I meant it.  Tune in tomorrow to find out what it is.

Football or Baking?

26 Aug

Pshaw!  Football, of course!  I know it’s just preseason, but my Green Bay Packers are on right now in a game against the Colts.  What of it?  If you’re not watching, the rest of my site is clearly awesome.  Take a look.

WHOAWAITTOUCHDOWN, PACKERS!  BYE!

On Food Porn. I Mean, Food Photography

25 Aug

I’ve mentioned before that I don’t have the time to learn how to shoot food in the way that food’s shot these days. You know, expensive camera aside, I don’t have time for retouching and selective focus and that perfectly perfect mess on the plate. Plus, I want to show that food can be made to look as good as it does in those retouched photos. So with me, you get the shots you get.

But according to this Wall Street Journal article, I’m either way ahead of my time, or so far behind it I’ll never have more than nine readers. As food stylist Alison Attenborough says in the article, “people are interested in small butchers, artisan producers, farmer’s markets—a more handmade look.”  See, I just don’t think that’s enough.  Think about it: You remember those shots from old issues of Gourmet? The Julia Child Menu Cookbook? Do you think Martha Stewart serves lopsided cake?  I mean, really.

I’ll give you an example of the problem.  I was in a local bakery recently to find pastries clearly made by someone who has the right touch for it. But the baker stopped short, and I don’t know why: She obviously handled the dough perfectly, but left it looking hamfisted, as though it was destined for a bake sale for the blind.  I understand that this is the trend, but why wouldn’t you want to do more?

So when you’re that close, people, don’t stop. Then you won’t have to touch up your food shots like a Playboy centerfold, and you can save all that Photoshop time for something more important: Making people happy with your bakery–and being the one who can do the very best.

More About Those Brownies

24 Aug

Obviously, I have not revisited my problems with perfectionism yet.  Right now I’m just happy I don’t have a headache, and that I do have replacements for some of the Time-Life Good Cook books lost to a move, plus a new-to-me biography of Anton Chekhov.  I’m just in no mood to get existential about all my shit at the moment.

Now, I say obviously because yeah, I’m still thinking about those brownies.  They really are a massive success, but they do soften up more than I expected overnight.  It’s not a dealbreaker, but I’m not a big fan of it, either.

I thought about how, with such a balanced proportion of fats, wet and dry ingredients, this could possibly be happening.  They really should dry out a bit like any other baked good, yes?  Well, no.  If you recall, these brownies have small jar of jam in the recipe–eight heaping tablespoons.  And guess what’s in nearly all commercial jams and jellies, and in great quantities at that?  No, not fruit.  Please.

Nah–it’s corn syrup.

If you’ve read other posts of mine, then you know that like honey and brown sugar, corn syrup is highly hygroscopic.  And A/C or not, it’s been a humid summer here in the heartland, so there’s plenty of hot hygroscopic action to go around.  I also keep my cake plate near a window of my 120-year-old house, which is dumb.

So there you have it.  Figuring this out solves another issue I was having with the lack of actual fruit flavor in these brownies.  See, in order to prevent the brownies from going soft–and again, it’s not bad by any stretch–the jam can be removed from the mix and instead heated and spread across the top in syrup form.  Well, depending on the humidity, maybe that’s a step to hold until just before serving; even just resting the jam on top will cause far less softening, but there will be a bit of softening nonetheless.  Either way, the fruit flavor will be far more evident if it’s withheld from the mix, as your tasters will be able to better discern the two different flavors.

Until tomorrow then, when I’ll fit in a post between exercising and White Collar.

Baking Wishes and Baking Dreams

23 Aug

I’m at bit of a loss tonight. I don’t know what to write about, except to say that even with the carb-free lifestyle the roommate and I live most days of the week, those brownies are nearly gone. Man, did they ever turn out. Thanks to Penzeys for the great cocoa, and to Cook’s Illustrated and Shirley Corriher for being willing, like so few other resources, to make the science known to us here on the ground. And of course, thanks to me for putting it all together.

I will note, however, that as well as those brownies turned out, like the writing I do, the work’s never done. I’ll continue to think and retest until I’m completely satisfied with the recipe, which will be never.

For example, do I pursue an relatively airy brownie that would better feature the fruit flavor? Do I let that sugar sit and steep for even longer–say, 10 minutes or so?  Would that help?   Do I add chocolate chips?  Is it too chocolatey for most?  How do these resolve overnight?  What about the fruit bits I discussed in an earlier post?  Whipped cream? And if so, do I make a stiff batch of it, or keep it natural?  And so on.

The issues this presents, though, are those of time and purpose. The brownie recipe I’m discussing here is an exceedingly easy one, but there’s time for prep, 30 minutes in the oven and, in this case, a very long time to cool. And all to test what to me are very important changes, but in the big scheme of things really are not that big of a deal at all. It’s personally fulfilling for me to get things just right but I’m wondering if I should rethink the loose limits of my perfectionism.

Do you find yourself wrestling with when to stop?  How do you decide?  When are the changes worth it?  When have you finally done enough?

The San Diego Chargers Ruined My Baking Dreams

17 Aug

Due to the fact that the fight song for the San Diego Chargers has given me brain damage, I will be unable to post any superbly written baking news today. I will however return tomorrow after a full 24 hours of not hearing that song.

See you tomorrow.

Brownie Baking Test Post-Mortem

16 Aug

Just to start, you should know that I pulled out the AP Style Guide to figure out if “post-mortem” takes a hyphen. I guess it does, but I think it looks like shit. Why do I continue to follow AP style when I truly think it’s kind of crap? This is what happens while I wait for my similarly shitty brownie photos load up, I guess. Ah, yes, things are already going as well as can be expected for your Belligerent Baker. But here goes.

I’ve discovered now with test no. 2 that there are more complications to creating what appears to be the same, professionally made brownie seen here. As I mentioned in the last post, these are good brownies for such an easy recipe, but I think that making that brownie at home will require more complex preparations.  One of my goals has always been getting to what’s in the picture, no matter how stylized or retouched, and I’ve found that it can certainly be done with the extra work and research; but for reasons I’ll get into here in a minute, this recipe’s no different despite its very smart premise.

My tasters and I are also experiencing a bit of a disconnect between the texture and density of the brownie, and the actual chocolate flavor.  Now, I was able to mature the chocolate flavor quite a bit with some easy substitutions, but that doesn’t change the fact that generally speaking, chocolate baked goods made with solely with cocoa taste like cake, not like a brownie.  See, when you’re testing, you can finagle the flavor or the texture, depending where you are in the process.  But when you want to perfect a recipe, you’ve got to balance both.  I did not account for this in test no. 2 because I’d hoped the flavor adjustments would be enough.  You’ll be happy to know I’ve got a really simple fix for that.  But first?  The breakdown.

Ingredients

I’ll not bore you with a diatribe about the original recipe’s instructions to use organic, local crap.  Although I would dearly love to, because I’m broke from it and anything that cuts into my soda budget makes me mad.  Anyway, I’ll just reiterate here that I noticed absolutely no difference in performance and taste from either the $4 dozen of eggs or the $5 pound of butter.

The cocoas?  This is just a matter of taste and appearance; you may prefer the flavor and color of natural cocoa, and that’s fine.  I prefer Dutch-processed.  (You may also like Saco and Special Dark as well, both of which are a combination of natural and Dutched cocoas.)  Whichever one you choose, though, what is absolutely essential is the addition of the espresso paste.  Without it, the top note is truly just the three cups of sugar.  If you can’t find instant espresso, instant coffee will do in a pinch.  Just keep it small, so you don’t change your proportions.

2 TBL instant espresso, a splash of boiling water, and a wee whisk is all you need here.

A baker's best friends.

Obviously, all-purpose flour is called for here. What happened, though, is that the first batch, made to spec, produced a brownie that was dense, sure, but still had a rather unrefined crumb. The color of the natural cocoa didn’t help this, and the result looked a bit amateurish. Cocoa can also clump together, not necessarily in visible balls, but just several grains at a time; this will also affect the crumb. After setting, too, will such a high quantity of fat in the recipe, the brownie itself became a bit spongey. So for test no. 2, I sifted the cocoa and flour after measuring. This, along with the processed sugar, certainly helped refine the crumb a great deal, but the issue of sponginess after setting remained.

But that’s not the only issue the developed upon setting. As we all know, fat carries flavor, and the great quantity certainly works to that effect here.  I will say again that this is a great idea, although it may not work quite right in a noncommercial setting.  Here’s what I believe happened.

There’s not a great deal of dry ingredients vs. wet/fat in the proportions.  The purpose, of course, is to make a rich, fudgy brownie without the added work of melted chocolate.  But with such a low proportion of dry to wet/fat ingredients, the brownies in effect become greasy after setting.  Yes, you read that right: Greasy.  In a bakery, these things don’t sit around too long, so no great shakes, I guess.  And of course, you can skirt this issue by serving it with a fork and plate, but this doesn’t fit my definition of a brownie.  Or of perfect.

As it happened, the recipe developed an issue with the seven eggs as well.  And that brings us to the process.

Directions and Process

I should say first that for the most part, the directions here are spot-on.  The creaming of the butter and sugar is a brilliant idea, and gives the brownies a structure I’m certain they wouldn’t have otherwise. Without a way to bloom the cocoa, I do recommend adding the salt, and full two teaspoons at that, to the butter and sugar mixture as an activator.  I also recommend sifting and processing the dry ingredients, but it’s not criminal if you don’t.  But what is criminal is my failure, as well as the original’s failure, to take into account the seven eggs in the baking process.  Eggs are delicate ingredients, but adding one or two to an already big mix will require no special treatment.  But seven?  I’m an idiot.

If you’ve ever made a custard, a mousse, or a proper cheesecake, then you know you need bake these things in a bain-marie–a water bath–so the whole thing bakes evenly.  Failing that, the high quantity and delicacy of the eggs will allow for the outer edges to bake far faster, causing them to crust up and pull away from the pan.  Which is so amateur-hour, I can’t even say.  This happened in both tests, and I could smack myself for failing to make the adjustment the first time.  I guess I just wanted to believe that I could still manage this without adding excess trouble for you, and trust me, baking in a bain-marie is a bitch.  But check it out:

Wow, that's ugly.

The edges are soft, to be sure, but I’d like to know how–or if–the bakery managed to avoid this ugly problem. Or do they just cut the edges off before serving? (Not that this is bad; it’s important to be able to disguise your mistakes.) But it’s the omission of this enormous little detail that drove me to start this project in the first place. I mean, I know these are satisfactory, and a lot of people will love them just as they are, but give us the chance to do the best we can with it. Tell us what’s really going to happen.

Further Improvements

Of course, I’ll be doing these again to create a better home version.  I don’t want you to have to use a water bath for what are proper-looking but still just a stupid pan of brownies, and I don’t want you to mess around with melted chocolate if you don’t have to.  But this just still isn’t right for home use.  Just off the top of my head, here’s what I think needs to happen:

  • Different fats, fewer eggs: A lot of the gloss and chew evident in the original photo can come from splitting the butter with some oil; this will also settle far better over time.  Put the oil over a low heat, too, and you can bloom the cocoa in it for a richer flavor.  As for the eggs, I just don’t think seven is necessary for either structure or flavor.  And omitting several will eliminate the need for a bain-marie.
  • Slightly cakier texture: The oil will help encourage a somewhat lighter texture, but that sponge business aside a new texture is mostly for flavor improvement, to be honest.  That’s because the cocoa flavor is better suited to a slightly lighter texture, and the fruit jam–yeah, remember that–will pop more in a lighter brownie, too.  I don’t mean that these need to be airy, per se, but this recipe needs to lighten up a bit to make more sense.
  • Intensified bites: This one’s important.  If you choose to go with this recipe as is (including my necessary substitutions), this is the easy flavor fix I mentioned early on.  To create a flavor that will be in balance with the heavy texture, simply add a bag of chocolate chips, or a couple of chopped up candy bars or baking chocolate–whatever’s handy.  I might even say milk chocolate’s your best bet, assuming that you’ve added an espresso paste to your mix.  You may even want to throw in a bag of frozen berries just before baking, too.  Just be sure to fold them in gently.

Lastly, here’s a shot of the finished product.  Please let me know if you have any questions, and apologies for the bad grammar.

Do remember to check back, since I’ll keep thinking about this one.

Obviously shot on the good side.